Switching Between Tidyverse and Pandas for Tabular Data Wrangling: Importing Data
Introduction
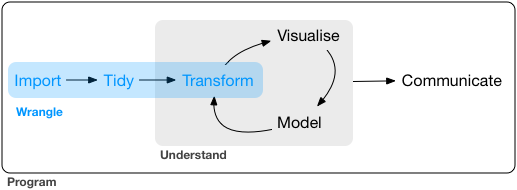
R’s tidyverse package1 and Python’s pandas package are indispensable for efficient tabular data wrangling. While I prefer using R and tidyverse for most data science work, I also use Python specifically for deep learning projects and so I find it necessary to be fluent with both packages. However, switching between them is no easy task since there are quite many differences. To reduce the nuisance, it would be helpful to summarize and compare how the two packages handle some main data wrangling tasks including: importing data, tidying data and transforming data (see Figure 1 , which is taken from (Wickham and Grolemund 2016)).
1 Technically, tidyverse is not a single package; it is a collection of complementing packages that share the same design philosophy, grammar, and data structures (see here).
The focus of this post is on importing/exporting data from/to some common file formats, including CSV and feather. Note that this post does not intend to cover all aspects of this topic, but only the ones I consider most necessary and common; hopefully this will minimize mental load.
Prerequisites
The code provided in the next few sections requires the following packages:
tidyversefor R;featherfor R;pandasfor Python;feather-formatfor Python.
See my other posts (this and this) for instructions on how to install these packages.
Importing/exporting CSV files
If you are unfamiliar with CSV files, here is a brief description from WikiPedia:
…, a comma-separated values (CSV) file is a delimited text file that uses a comma to separate values. A CSV file stores tabular data (numbers and text) in plain text. Each line of the file is a data record. Each record consists of one or more fields, separated by commas.
It is worthwhile to note that although (as the name suggests) CSV files usually uses the comma character as the separator, it is also quite common to encounter files using other characters (e.g., tab) as the separator.
The CSV format can be parsed by many software and is therefore my favorite. In practice, I find the following aspects to be particularly relevant when handling this kind of files:
- Does the file contain column names? If not, how to specify?
- What is the data type of each column?
- which character is used as the separator?
- What is the character encoding of the file?
- How are missing values denoted in the file?
Note: this post does not discuss the usage of quoting characters in CSV files; for more information, you may want to checkout another post.
Next, let’s examine how to properly import/export CSV files with tidyverse and pandas respectively.
The tidyverse way
Tidyverse provides the read_delim() function to import CSV files. E.g.:
library(tidyverse)
dataset <- read_delim(file = "path/to/file_to_read.csv", delim = ",")
The file parameter specifies the path of the CSV file to import from, while the delim parameter specifies which character is used as the separator. The followings are some optional parameters that address the aforementioned aspects of dealing with CSV files:
col_names. This parameter defaults toTRUEso that the first row of the file will be taken as the column names, and will not be included in the data frame. If the file does not contain column names, then this parameter should be set toFALSE(in which case column names will be generated automatically:X1,X2,X3etc.), or a character vector of column names (in which case the values will be used as the names of the columns).col_types. This parameter defaults toNULLso that all column types will be imputed automatically. In case the imputation fails or is wrong, you will need to specify the types manually. I prefer using thecols()specification to declare column types (as opposed to the string specification; see documentation for more details). For examplecol_types = cols(x = col_character)declares the column namedxto be of type character, while the types of other unmentioned columns will be guessed. Here are other specifications for various types:col_logical();col_integer();col_double();col_character();col_factor();col_date();col_datetime().
locale. This parameter controls various locale settings (character encoding, etc.) and defaults todefault_locale(). I mostly set this parameter only when I need to specify the encoding of the CSV file. For example,locale = locale(encoding = "UTF-8"),locale = locale(encoding = "GBK"), etc2.na. This parameter defaults toc("", "NA")so that null strings and the character sequence “NA” will be taken as missing values. I like to set this to just""so that the output is consistent with the Python’s.
2 Run iconvlist() to get a list of available encodings.
To export data to CSV files, use the write_delim() function. E.g.:
write_delim(x = dataset, path = "path/to/file_to_write.csv", delim = ",")The x parameter specifies the data frame to be exported, the path parameter specifies the path of the output file, and the delim parameter specifies which character is used as the separator. The followings are some optional parameters:
na. Defaults toNA; but for consistency, I like to always set it to""so that missing values are presented as null strings.col_names. Defaults toTRUE. Set it toFalseif you don’t want to include column names in the output file.
Note that write_delim() does not have the locale parameter and the output file will always be encoded in UTF-83.
3 If you are on a Windows platform and want to open the CSV file in Excel, then you should use the write_excel_csv() function instead.
The pandas way
Pandas provides the read_csv() function to import CSV files. E.g.:
import pandas as pd
dataset = pd.read_csv(filepath_or_buffer = "path/to/file_to_read.csv", sep = ",")
The filepath_or_buffer parameter specifies the path of the CSV file to import from, while the sep parameter specifies which character is used as the separator. The followings are some optional parameters that address the aforementioned aspects of dealing with CSV files:
header(defaults to"infer") andnames(defaults toNone). The defaults of these two parameters makes the function to treat the first row of the file as column names. If there is no column names in the file, you can either: setheader = Noneso that column names will be imputed (0,1,2, etc.); use thenamesparameter to set the column names explicitly (e.g., suppose there are three columns and you want to name them respectively asX1,X2,X3, then setnames = ["X1", "X2", "X3"]).dtype. This parameter defaults toNoneso the data types will be imputed automatically. In case you need to declare the data types explicitly, you can pass a dictionary that maps columns with data types. For example,dtype = {"x": str}declares the column namedxto be of type str, while the types of other unmentioned columns will be guessed. There are many other types, which includes but is not limited to:numpy.int;numpy.float;numpy.object(including character string and other objects).
encoding. This parameter defaults toNoneso the encoding depends on system default. To choose another encoding, for example GBK, setencoding = "GBK". See here for a list of available encodings.keep_default_na(defaults toTrue) andna_values(defaults toNone). These default settings of these two parameters treat many sequences as missing values:['-1.#IND', '1.#QNAN', '1.#IND', '-1.#QNAN', '#N/A N/A', '#N/A', 'N/A', 'n/a', 'NA', '#NA', 'NULL', 'null', 'NaN', '-NaN', 'nan', '-nan', '']. For consistency and simplicity, I always preferkeep_default_na = Falseandna_values = [""].
To export data to CSV files, use the to_csv() method of the data frame object. E.g.:
dataset.to_csv(path_or_buf = "path/to/file_to_write.csv", sep = ",")The path parameter specifies the path of the output file, and the sep parameter specifies which character is used as the separator. The followings are some optional parameters:
na_rep. Defaults to""so missing values will be presented as null strings.header. This parameter defaults toTrueso column names will be written to the first row of the file. If you want to omit the column names, setheader = False.index. This parameter defaults toTrueso row indices will be written to the file. Change it toFalseif you don’t need this behavior.encoding. See above.
Importing/exporting feather files
Although CSV files are very commonly used, it still has some drawbacks:
- Lack of metadata (e.g., data type, pandas indexes4), which results in extra effort in post-processing5.
- Lack of unified standard, which results in dozens of parameters to deal with special cases.
- Poor performance when reading/writing large datasets.
4 Although there are some parameters that allow restoration of indexes, I personally think this is over-complicated and never used this feature.
5 For example, if you save a CSV file with a date column from R and read it with Python, chances are that column will be of type str. To restore the data type, you’ll need to tweak some optional parameters of pd.read_csv() or do some manual type conversion.
To address these problems, Wes McKinney (creator of pandas) and Hadley Wickham (creator of tidyverse) co-designed the feather format, which is supported by various languages including R, Python, Julia, etc. You can learn more about it here.
Note: at the time of this writing, feather is not yet mature, but progress is being made.
The tidyverse way
To read a data set stored in a feather file, use feather::read_feather(). E.g.:
dataset <- feather::read_feather(path = "path/to/file_to_read.feather")To save a data set to a feather file, use feather::write_feather(). E.g.:
feather::write_feather(x = dataset, path = "path/to/file_to_read.feather")The usage of these functions is very straight-forward. Unlike reading data from CSV files, there is no optional parameters for you to worry about. All metadata will be preserved and so when you read it back to R, Python, etc., the data will be exactly the same as it was. What’s more, as this benchmark shows, reading an 800MB feather file only takes about 1 second, which is much faster than reading a CSV file that stores the same dataset.
The pandas way
To read a data set stored in a feather file, use pd.read_feather(). E.g.:
dataset = pd.read_feather(path = "path/to/file_to_read.feather")To save a data set to a feather file, use the to_feather() method of a data frame. E.g.:
dataset.to_feather(fname = "path/to/file_to_read.feather")As you can see, the syntax is very much like the equivalent in R. To some extent, this makes switching between R and Python more convenient.
Learning more
If you want to learn more about importing data using tidyverse or pandas, here are some useful resources:
- R for Data Science by Wickham and Grolemund (2016);
- Python for Data Analysis by McKinney (2018);
- The documentation of readr (tidyverse.org 2018);
- The documentation of pandas (pydata.org 2018);
- The documentation of feather (Wes McKinney [2016] 2018).